Selasa, 12 Juli 2011

[AyoDance] Audition Hack v.6067 By Aldy


Download [LINK]

Fiture :
Feature :
F3 PF BeatRush ON
F4 PF BeatRush OFF
F5 Bug Story ON
F6 Bug Story OFF
Insert Arrow 2 Key
Page Up Peach Emoticon
Page Down No Sensoric Words
End Time Hack

Thanks To Aldy Ramadhan

[Point Blank]Cheat Point Blank 1 Hit Sg [Update] 12 July 2011

Cheat Point Blank 1 Hit Sg [Update] 12 July 2011
Credit:
[-]seanKinG

recycling :
[-]E991

Fitur:

- 1 HIT SG Gosong
- 1 HIT M1887 (CASH)
- 1 HIT SPASS-15
- 1 HIT SPASS-15 D (CASH)
- 1 HIT 870MCS W.
- 1 HIT 870MCS W D (CASH)

Hotkey
No hotkey Auto on

Tutorial:
1.Buka All SG.exe
2.Buka PB ...lalu stars
3.jika notice cheat keluar tekan ENTER/OK, jangan gerakkan Mouse
4.Happy chain killer-killer

Nb :
[-] Harus install Net Framework danVcredist_x86
[-] klo bugtrap coba gunakan metode flasdisk

Senin, 11 Juli 2011

[Microsoft]Download Official Windows Media Center Edition (MCE) Desktop Wallpaper from Microsoft

While looking for some information about Windows Media Center Edition (MCE) at Microsoft website, I came across a cool wallpaper which was released by Microsoft as a part of MCE promotion.
The wallpaper comes in 1280x1024 screen resolution.
People who like using official Windows wallpapers and who love simple and clean wallpapers, will definitely like this official wallpaper.
Following is a preview of this wallpaper:

You can download the wallpaper using following link:
Download Link
Following are 4 more MCE wallpapers which were released along with the above mentioned wallpaper:
Wallpaper 1 | Wallpaper 2 | Wallpaper 3 | Wallpaper 4
Also check following wallpapers:

[Windows XP]Transform Windows XP into Windows Vista without using Customization Pack

The most interesting thing in Windows Vista is its look, new icons, cursors, theme, sounds, login screen, boot screen, etc.
If you are still using Windows XP but want to enjoy the new Windows Vista look, then this tutorial will definitely help you.
After following this tutorial, you'll get the same Windows Vista look in your Windows XP. Following is a list of things which are going to change after following this tutorial:
  • Windows Theme or Visual Style
  • Icons
  • Boot Screen
  • Login Screen or Welcome Screen
  • Sounds
  • Cursors
  • Sidebar
  • Progress dialog box
  • Shutdown/Log off dialog box
  • About Windows box
  • System Properties dialog box
  • A few other mods
NOTE 1: If you want to download all BITMAPs, AVIs and other files mentioned in this tutorial in a single pack, you can download it using this link.
NOTE 2: Please create a Restore point using "System Restore" before applying anything mentioned in this tutorial so that you can restore your system back to default if you don't like the changes.
Also take a backup of system files before modifying them, so that you can restore them if anything goes wrong or you don't like the new change.
NOTE 3: If you are facing problems while saving a file after editing in resource hacker, then make sure you have disabled WFP (Windows File Protection) service using "WFP Patcher" or use "Replacer" to replace the file. Both utilities can be found in our "Download" section.
Also if you are getting error "Can't create file...", that means you have edited and saved the same file in past and there is a backup file which needs to be deleted before saving this file again. Go to the folder containing this file and you'll see a similar file having "_original" in its name. Delete it and try to save the file in resource hacker.
So here we start our transformation tour:
1. Windows Theme or Visual Style:
First thing which you should change is XP theme. You can get Windows Vista look in XP using "VistaVG Ultimate" theme:

VistaVG Ultimate Theme for Windows XP
2. Icons:
Here is an Icon Pack for Windows XP, which will change XP default icons with Windows Vista icons. So you’ll experience the high-resolution Vista icons in XP:

VistaVG Icon Pack for Windows XP
3. Boot Screen:
In Vista, Microsoft has removed the graphical boot screen and there is a minimal boot screen with just a progress bar. But it looks nice and you can download a similar boot screen for XP from here:
Download VistaVG Boot Screen
Use Tuneup Utilities to apply it. Its completely safe. To know more about Tuneup Utilities, visit following link:
How to change Windows XP Boot Screen using Tuneup Utilities
4. Login Screen or Welcome Screen:
Vista new login screen is just awesome and "RaulWindows" at DeviantART has created a look-a-like login screen for XP, which you can download from here:

Download Vista Login Screen
5. Sounds:
Vista contains new sounds, which are quite nice. You can download the whole pack from here:
Download Vista Sounds
Just open "Sounds & Audio Devices" (mmsys.cpl) in Control Panel and goto "Sounds" tab and here you can replace windows default sounds with the new ones.
6. Cursors:
You can download Windows Vista cursors using following link:
Download Cursors
7. Sidebar:
Windows Vista comes with a cool Sidebar which is displayed on Desktop.

"joshoon" @ DA has ported the same Sidebar to XP which can be downloaded using following link:
Download Link
8. Progress Dialog Box:
Vista progress dialog box is different from XP. But we can make our XP dialog box to look-a-like Vista one by using Resource Hacker.

Just open "%windir%\System32\Shell32.dll" file in Resource Hacker and then go to:
Dialog -> 1020 -> 1033
Now replace the existing code in right-side pane with the following code:
1020 DIALOGEX 20, 20, 237, 134
STYLE DS_FIXEDSYS | DS_MODALFRAME | DS_NOIDLEMSG | WS_MINIMIZEBOX | WS_POPUP | WS_CAPTION | WS_SYSMENU
EXSTYLE WS_EX_APPWINDOW
CAPTION ""
LANGUAGE LANG_ENGLISH, SUBLANG_ENGLISH_US
FONT 8, "MS SHELL DLG"
{
CONTROL "", 106, "SysAnimate32", ACS_TRANSPARENT | ACS_AUTOPLAY | ACS_TIMER | WS_CHILD | WS_VISIBLE, 65532, 0, 236, 25
CONTROL "Location:", 0, STATIC, SS_LEFT | WS_CHILD | WS_VISIBLE | WS_GROUP, 10, 30, 31, 10
CONTROL "", 103, STATIC, SS_LEFT | SS_NOPREFIX | WS_CHILD | WS_VISIBLE, 70, 30, 155, 10
CONTROL "File name:", 0, STATIC, SS_LEFT | WS_CHILD | WS_VISIBLE | WS_GROUP, 10, 45, 33, 10
CONTROL "", 102, STATIC, SS_LEFT | SS_NOPREFIX | WS_CHILD | WS_VISIBLE, 70, 45, 155, 10
CONTROL "Time remaining: About", 0, STATIC, SS_LEFT | WS_CHILD | WS_VISIBLE | WS_GROUP, 10, 60, 83, 10
CONTROL "", 105, STATIC, SS_LEFT | SS_NOPREFIX | WS_CHILD | WS_VISIBLE, 93, 60, 155, 10
CONTROL "Speed: 10.2 MB/sec", 0, STATIC, SS_LEFT | WS_CHILD | WS_VISIBLE | WS_GROUP, 10, 73, 103, 10
CONTROL "", 104, "msctls_progress32", PBS_SMOOTH | WS_CHILD | WS_VISIBLE, 10, 88, 217, 10
CONTROL 404, 0, STATIC, SS_BITMAP | WS_CHILD | WS_VISIBLE | WS_CLIPSIBLINGS | WS_GROUP, 65530, 107, 267, 28
CONTROL "Cancel", 2, BUTTON, BS_DEFPUSHBUTTON | WS_CHILD | WS_VISIBLE, 177, 113, 50, 16
}
Click on Compile Script button.
You'll also have to replace existing AVIs in the file with new Vista ones. Just download following ZIP file and extract it:
Download AVIs and BMP
After extracting the ZIP file you'll get 3 AVI files and 1 BMP file. Replace existing AVIs in shell32.dll file with these new ones in following manner:
AVI -> 160 ->1033 with 160.avi
AVI -> 161 ->1033
with 161.avi
AVI -> 162 ->1033 with 162.avi
AVI -> 163 ->1033 with 162.avi
AVI -> 164 ->1033 with 162.avi
Now add the 404.bmp file at 404 location in file. Just click on Action -> Add a new resource and then click on Open file with new resource button. Select the downloaded BMP file and click on Open. Now in Resource Name enter 404 and in Resource Language enter 1033 and click on Add Resource button. That's it.
9. Shutdown/log off dialog box:
Windows Vista doesn't have any shutdown / log off dialog box but we can redesign Windows XP default shutdown box to make it more refreshing like following screenshot:

Download required BMP files from here:
Download Shutdown BMPs
Extract the file and you'll get 4 BMPs with the name:
1.bmp
2.bmp
3.bmp
4.bmp

Now open "%windir%\System32\Shell32.dll" file in Resource Hacker and then replace following BITMAPs with the mentioned BMP files:
Bitmap -> 14351 -> 1033 with 1.bmp
Bitmap -> 14353 -> 1033 with 2.bmp
Bitmap -> 14354 -> 1033 with 1.bmp
Bitmap -> 14355 -> 1033 with 2.bmp
Bitmap -> 14356 -> 1033 with 3.bmp
now save the file and open %windir%\System32\msgina.dll file in Resource Hacker and then replace following BITMAPs with the mentioned BMP files:
Bitmap -> 20140 -> 1033 with 1.bmp
Bitmap -> 20141 -> 1033 with 2.bmp
Bitmap -> 20142 -> 1033 with 1.bmp
Bitmap -> 20143 -> 1033 with 2.bmp
Bitmap -> 20150 -> 1033 with 4.bmp
Now save the file.
10. About Windows box:
To change the About Windows box you'll have to change 2 things: the BITMAP file and the text of box saying Windows XP.
Download the required BITMAP file from here:
Download About BMP
Open "%windir%\System32\Shell32.dll" file in Resource Hacker and then replace following BITMAPs with the downloaded BMP file:
Bitmap -> 131 -> 1033 (For XP Professional)
Bitmap -> 147 -> 1033 (For XP Home)
Now open %windir%\System32\msgina.dll file in Resource Hacker and then replace following BITMAPs with the downloaded BMP file:
Bitmap -> 101 -> 1033 (For XP Professional)
Bitmap -> 107 -> 1033 (For XP Professional)
Bitmap -> 128 -> 1033 (For XP Home)
Bitmap -> 129 -> 1033 (For XP Home)
Now to change the text of dialog box, open "%windir%\System32\xpsp1res.dll" file in Resource Hacker and then goto:
Dialog -> 14352 -> 1033
Now replace the existing code in right-side pane with the following code:
14352 DIALOGEX 20, 20, 275, 198
STYLE DS_FIXEDSYS | DS_MODALFRAME | WS_POPUP | WS_CAPTION | WS_SYSMENU
CAPTION "About %s"
LANGUAGE LANG_ENGLISH, SUBLANG_ENGLISH_US
FONT 8, "MS Shell Dlg"
{
CONTROL 0, 12297, STATIC, SS_ICON | WS_CHILD | WS_VISIBLE, 7, 55, 21, 20
CONTROL "Microsoft %s", 13568, STATIC, SS_LEFTNOWORDWRAP | SS_NOPREFIX | WS_CHILD | WS_VISIBLE, 35, 55, 200, 10
CONTROL "Copyright (c) 2006 Microsoft Corporation. All rights reserved.", 13578, STATIC, SS_LEFT | SS_NOPREFIX | WS_CHILD | WS_VISIBLE, 35, 75, 210, 10
CONTROL "", 13581, STATIC, SS_LEFT | SS_NOPREFIX | WS_CHILD | WS_VISIBLE, 35, 85, 180, 20
CONTROL "This product is licensed under the Microsoft Software License Terms to:", 13586, "SysLink", 0x50000000, 35, 105, 180, 20
CONTROL "user name", 13575, STATIC, SS_LEFT | SS_NOPREFIX | WS_CHILD | WS_VISIBLE, 45, 125, 180, 10
CONTROL "org name", 13576, STATIC, SS_LEFT | SS_NOPREFIX | WS_CHILD | WS_VISIBLE, 45, 135, 180, 10
CONTROL "", 13095, STATIC, SS_ETCHEDHORZ | WS_CHILD | WS_VISIBLE, 35, 147, 235, 1
CONTROL "Physical memory available to Windows:", 13570, STATIC, SS_LEFT | SS_NOPREFIX | WS_CHILD | WS_VISIBLE, 35, 152, 133, 10
CONTROL "", 13571, STATIC, SS_LEFT | SS_NOPREFIX | WS_CHILD | WS_VISIBLE, 170, 152, 88, 10
CONTROL "OK", 1, BUTTON, BS_DEFPUSHBUTTON | WS_CHILD | WS_VISIBLE | WS_TABSTOP, 220, 178, 50, 14
CONTROL "Version 6.0", 0, STATIC, SS_LEFTNOWORDWRAP | SS_NOPREFIX | WS_CHILD | WS_VISIBLE, 35, 65, 235, 10
}
Click on Compile Script button and save the file.
11. System Properties dialog box:
To change the System Properties dialog box, you can follow this tutorial:
Hacking System Properties Dialog Box (Sysdm.cpl file) in Windows XP
12. A few other mods:
1. Windows Vista shows the "View" menu on desktop too, you can also enable it in XP using following tut:
How to enable "VIEW" Menu on Desktop in Windows XP

2. Windows Vista's All Programs menu is different from XP, you can follow following tutorial to make your XP Programs menu similar to Vista:
Change Look-n-Feel of Windows XP Start Menu
3. In Windows Vista explorer, A small status bar is displayed under each drive icon showing the filled and free space in the drive.

You can also do the same in XP by using a 3rd party utility:
Download Vista Drive Status for XP
Just run the file and it'll add the status bar for each drive.
4. In Windows Vista explorer, we get Bread Crumbs in addressbar which is quite useful. You can also get the same feature in Windows XP using "QT Addressbar":

QT Addressbar: Windows Vista Addressbar Clone for Windows XP
5. In Windows Vista whenever you hover your mouse cursor over a Desktop icon, it shows a cool transparent rectangle over the icon. You can get the same effect in XP using following tool:
Vista_7_Icon_Mouse_Hover_Rectangle.png
Get Windows Vista and 7’s Desktop Icon Mouse Hover Effect in Windows XP
6. In Windows Vista when you press Alt-Tab to switch between opened applications, a glassy switcher screen is displayed which shows thumbnails of all running applications. You can get similar feature in Windows XP using following tool:
VistaSwitcher: The Best FREE Windows Alt-Tab Feature Replacement
That's all for now. After following all the above mentioned steps, you'll get Windows Vista look-n-feel in Windows XP.
NOTE: If you have any problem with Resource Hacker and want to know about it, then please go through following tutorials:
All About Resource Hacker in a Brief Tutorial
List of Files to be hacked using Resource Hacker
List of a few Locations in Windows XP System Files to be Hacked using Resource Hacker
PS: If you want to transform your Windows XP into 7, then following link will help you:
Transform Windows XP into Windows 7 without using Customization Pack
And if you want to transform your Windows Vista into 7, then following link will help you:
Transform Windows Vista into Windows 7 without using Customization Pack

Kamis, 07 Juli 2011

[Point Blank]Public Release Cheat Ninja Sg Kosong Updates 07- July 2011

Public Release Cheat Ninja Sg Kosong Updates 07- July 2011
Fiture :
->Cheat Ninja SG Kosong

Hotkey :
->Klik Kiri

NB :
->Coba Anda Masu room SG
->Pakai SG Kosong|pabrik
->play saja
->tekan Klik Kiri...
->Jadi Ninja dah lo..!!

Credit : Ferry-Adanya|Maho Sejati

Special Thanks To :
->All member F2f
->All Maho f2F

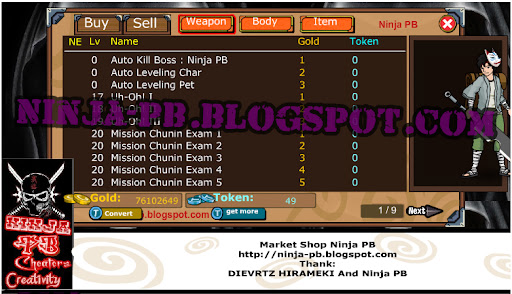
[Ninja Saga]Market Shop [Update] | Ninja Saga

Market Shop [Update] | Ninja Saga
Peralatan :
Caranya :
  1. Download Dulu Fiddler
  2. Terus Instal Fiddler (bila tidak bisa di instal , instal dulu "Microsoft .NET Framework 2.0 Service Pack 2" )
  3. Jalankan Fiddler
  4. Clik Autoresponder (yang icon petir warna Hijau )
  5. Contang Kotak "Enable Automatic Responses" dan centang juga "unmatched request passthrough"
  6. Jatuhkan Semua Fillse SWF yang kamu tadi download ke kolom "AutoResponder"
  7. Masuk ke Ninja Saga
  8. Setelah itu bersihkan chace
  9. Terus pilih karakter yang akan kamu mainkan
Cara Menghapus Cache :

  • Mozilla Firefox : Tools > Options > Advanced > Pilih Network Tab > Clear Now > Klik OK
  • Google Chrome : Pilih icon yang berada di pojok kanan atas (sebelah bintang) -> Options -> Under the Hood > Clear Browsing Data > Empty the cache > Clear Browsing Data
Fitur :

  • Auto Kill Boss
  • Auto Leveling Char/Caracter
  • Auto Leveling Pet
  • Hack Achievents
  • Gold Hack
  • TP Hack ( 40 TP/Day )
  • Dll


Cara Pemakaian Cheatnya :
Masuk ke Academy dan Silahkan Pilih Cheat Yang mau anda jalankan

Credits : Ninja PB, Dievrtz